

*This post contains affiliate links. If you purchase an item from a link below I will receive a small commission at no extra cost to you. This helps keeps the free patterns flowing! All links are to products that I use and love, thank you for supporting Grace and Yarn! For more information check out our disclosure here.
Happy Friday friends! I'm excited to share this fun new pattern with you! A little while back I ordered some Lion Brand Feels Like Butta yarn, I wanted to see what all the hype was.
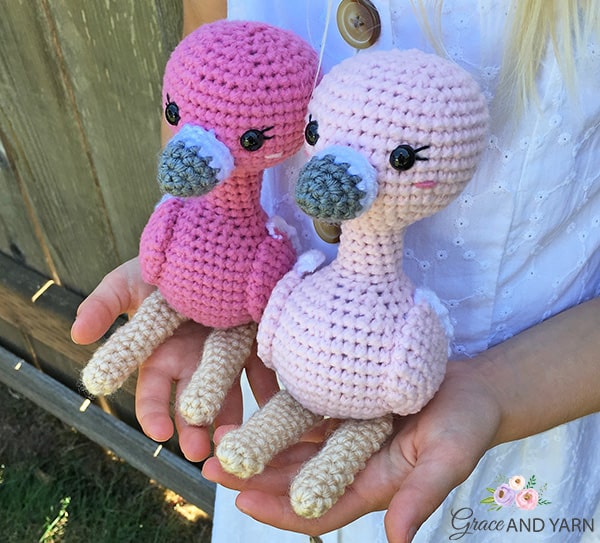
The feel was extra squishy and feathery soft! While this yarn would be lovely for a garment I had amigurumi in mind (as always)! I had two different shades of pink and flamingos instantly popped into my head. Also around this time two of my nieces were celebrating their 4th birthday and their room is decorated with flamingos, I couldn't resist!
In case I needed an extra reason to get these on my hook, we visited our local wildlife park and I fell in love with the flamingos there! Do you get inspired when you're out and about for new crochet projects?
I made these two in a mini version but as soon as I finished them I felt we needed a larger version too (you can find her here!). In a standing position these mini flamingos are about 8 inches tall (5.5 in a sitting position). If you'd prefer they end up a little bigger they would be super cute with a chunky (weight 5) yarn and 4mm or 4.5mm crochet hook!
I used Feels Like Butta Yarn in Dusty Pink and Pink to make these two feathered friends, but you can use any weight 4 yarn you prefer. I did notice it seemed on the thinner side when compared to I Love This Yarn or Yarn Bee (my usual go to for amigurumi). If using a different yarn your flamingo may end up just a pinch taller.
I will definitely be using Feels Like Butta again, in fact I went back and ordered it in yellow, white and a beautiful light blue! I'm not sure what I'll make with them yet but I love the soft feel of the yarn and the squish factor is comforting!
For this pattern the body and head are made as one piece. To help ensure a strong neck you will want to have tight stitches and firm stuffing. Be sure to stuff your body before beginning your neck as you won't have a large opening to work with. If you find your stitches are running on the loose side try going down a half size in your hook.
More Helpful Tips for Amigurumi
How to Stuff Your Amigurumi
Tips to Learning Amigurumi
Crochet Eye Tutorial (for those times you don't have the right size on hand)
Let's stay connected! Sign up for our newsletter here to be notified of new patterns, tutorials and giveaways! Be sure to also join the Grace and Yarn Crochet Group on Facebook and connect with others who love to crochet!

Pattern
PIN to save to your favorite crochet board!
Grab the ad-free PDF version in my Etsy or Ravelry shop!
You may make and sell items made from this pattern but please do not sell, share or reproduce the actual pattern. If you sell finished items online (Etsy, etc) please provide a link to the pattern and credit to me as the designer, thank you. I hope you enjoy this pattern!
Materials -
Abbreviations - US terminology
MC- Magic circle
SC- Single crochet
SC INC- Single crochet increase
INV DEC- Invisible decrease
DC – Double crochet
St(s)- Stitch(es)
Sl st – Slip stitch
NOTES -
- Slowly stuff as you go, you want it to be firm but not stretched. You will be working in the round; I like to use a stitch marker at the beginning of each round.
- The body and head will be made as one piece. I recommend tight stitches and firm stuffing to help avoid a wobbly neck.
Beak –
With grey
Round 1: Create a magic circle with 6 SC
Round 2: SC around (6)
Round 3: SC INC in each st (12)
Round 4: SC around (12)
Change to white
Rounds 5-6: SC around (12)
Fasten off leaving a long tail for sewing onto the head.

Body –
With pink
Round 1: Create a magic circle with 6 SC
Round 2: SC INC in each st (12)
Round 3: SC in the first st, SC INC in the next, repeat around (18)
Round 4: SC in the first 2 sts, SC INC in the next, repeat around (24)
Round 5: SC in the first 3 sts, SC INC in the next, repeat around (30)
Round 6: SC in the first 4 sts, SC INC in the next, repeat around (36)
Round 7: SC in the first 5 sts, SC INC in the next, repeat around (42)
Rounds 8-12: SC around (42)
Round 13: SC in the first 5 sts, INV DEC in the next, repeat around (36)
Round 14: SC in the first 4 sts, INV DEC in the next, repeat around (30)
Round 15: SC in the first 3 sts, INV DEC in the next, repeat around (24)
Round 16: SC in the first 2 sts, INV DEC in the nex,t repeat around (18)
Round 17: SC in the first st, INV DEC in the next, repeat around (12)
Rounds 18-23: SC around
Here is where we will start the head
Round 24: SC in the first st, SC INC in the next, repeat around (18)
Round 25: SC in the first 2 sts, SC INC in the next, repeat around (24)
Round 26: SC in the first 3 sts, SC INC in the next, repeat around (30)
Round 27: SC in the first 4 sts, SC INC in the next, repeat around (36)
Round 28: SC in the first 5 sts, SC INC in the next, repeat around (42)
Rounds 29-34: SC around (42)
NOTE: Here is where we will attach the facial features. Place the safety eyes 6 stitches apart between rounds 31 and 32. (For a girl version, I recommend sewing on the eyelashes before securing your safety eyes).
Beak - Sew the beak centered between the eyes with a small amount of stuffing.
Cheeks – With your tapestry needle and yarn for cheeks pass through one stitch on either side of your beak just under the eyes.

(Be sure to stuff the neck and shoulders firmly as you go. This will keep the neck sturdy.)
Round 35: SC in the first 5 sts, INV DEC in the next, repeat around (36)
Round 36: SC in the first 4 sts, INV DEC in the next, repeat around (30)
Round 37: SC in the first 3 sts, INV DEC in the next, repeat around (24)
Round 38: SC in the first 2 sts, INV DEC in the next, repeat around (18)
Round 39: SC in the first st, INV DEC in the next, repeat around (12)
Round 40: INV DEC around (6)
Fasten off and sew remaining part closed, weave in your end.
Tail-
With pink
Round 1: Create a magic circle with 6 SC
Round 2: SC INC in each st (12)
Rounds 3-4: SC around (12)
Round 5: SC in the first 3 sts, SC INC in the next 6, SC in the last 3 sts (18)
Round 6: SC around (18)
Round 7: SC in the first 6 sts, SC INC in the next 6, SC in the last 6 sts (24)
Round 8: SC around (24)
Fasten off leaving a long tail for sewing.

Wings-
Starting with pink, make 2
Round 1: Create a magic circle with 6 SC
Round 2: SC INC in each st (12)
Round 3: SC in the first st, SC INC in the next, repeat around (18)
Rounds 4-8: SC around (18)
Do not fasten off, we will now work across the top in rows.
Row 1: Fold flat (as pictured below) and make 9 SC across the top making sure to go through both top stitches. Leaving a long tail of your pink yarn change to white for the last row.
Row 2: *2 DC in the first st, sl st into the next*, *repeat across ending with 2 DC into the last st (this creates the feathers). Fasten off and weave in your white strand.

Legs –
With beige make 2, lightly stuffing as you go
Round 1: Create a magic circle with 7 SC
Rounds 2-12: SC around (7)
Fasten off leaving a long tail for sewing.
Assembly -
- First, sew the tail centered onto the back of the body stuffing as you go.
- Next, sew the wings centered with the facial features and a slight angle upward as pictured below.
- Lastly, sew the legs onto the bottom of your flamingo starting at the 2nd round and ending at the 6th round.

Your mini flamingo is complete! Feel free to share your flamingo with us in the group, we'd love to see them!
Love free patterns? Check out our latest One More Row free crochet link party! Free designs are submitted by various designers throughout the month and your clicks help decide the top 5 patterns that will be featured in next months party!
If you're a designer feel free to link up a free pattern, we'd love to share it! Thanks so much for stopping by!
The feel was extra squishy and feathery soft! While this yarn would be lovely for a garment I had amigurumi in mind (as always)! I had two different shades of pink and flamingos instantly popped into my head. Also around this time two of my nieces were celebrating their 4th birthday and their room is decorated with flamingos, I couldn't resist!
In case I needed an extra reason to get these on my hook, we visited our local wildlife park and I fell in love with the flamingos there! Do you get inspired when you're out and about for new crochet projects?
I used Feels Like Butta Yarn in Dusty Pink and Pink to make these two feathered friends, but you can use any weight 4 yarn you prefer. I did notice it seemed on the thinner side when compared to I Love This Yarn or Yarn Bee (my usual go to for amigurumi). If using a different yarn your flamingo may end up just a pinch taller.
How to Stuff Your Amigurumi
Tips to Learning Amigurumi
Crochet Eye Tutorial (for those times you don't have the right size on hand)
Let's stay connected! Sign up for our newsletter here to be notified of new patterns, tutorials and giveaways! Be sure to also join the Grace and Yarn Crochet Group on Facebook and connect with others who love to crochet!
PIN to save to your favorite crochet board!
Grab the ad-free PDF version in my Etsy or Ravelry shop!
Materials -
- Size 4 worsted weight yarn (50g of light or dark pink; small amount of white, grey, and beige)
- 3.5 mm crochet hook (these are the hooks I use)
- 9mm safety eyes
- Black crochet/embroidery thread for eyelashes (optional)
- Scissors
- Tapestry needle (bent tip needles work great for amigurumi)
- Stuffing
- Stitch markers (a piece of scrap yarn will also do the trick)
MC- Magic circle
SC- Single crochet
SC INC- Single crochet increase
INV DEC- Invisible decrease
DC – Double crochet
St(s)- Stitch(es)
Sl st – Slip stitch
NOTES -
- Slowly stuff as you go, you want it to be firm but not stretched. You will be working in the round; I like to use a stitch marker at the beginning of each round.
- The body and head will be made as one piece. I recommend tight stitches and firm stuffing to help avoid a wobbly neck.
Beak –
With grey
Round 1: Create a magic circle with 6 SC
Round 2: SC around (6)
Round 3: SC INC in each st (12)
Round 4: SC around (12)
Change to white
Rounds 5-6: SC around (12)
Fasten off leaving a long tail for sewing onto the head.
With pink
Round 1: Create a magic circle with 6 SC
Round 2: SC INC in each st (12)
Round 3: SC in the first st, SC INC in the next, repeat around (18)
Round 4: SC in the first 2 sts, SC INC in the next, repeat around (24)
Round 5: SC in the first 3 sts, SC INC in the next, repeat around (30)
Round 6: SC in the first 4 sts, SC INC in the next, repeat around (36)
Round 7: SC in the first 5 sts, SC INC in the next, repeat around (42)
Rounds 8-12: SC around (42)
Round 13: SC in the first 5 sts, INV DEC in the next, repeat around (36)
Round 14: SC in the first 4 sts, INV DEC in the next, repeat around (30)
Round 15: SC in the first 3 sts, INV DEC in the next, repeat around (24)
Round 16: SC in the first 2 sts, INV DEC in the nex,t repeat around (18)
Round 17: SC in the first st, INV DEC in the next, repeat around (12)
Rounds 18-23: SC around
Here is where we will start the head
Round 24: SC in the first st, SC INC in the next, repeat around (18)
Round 25: SC in the first 2 sts, SC INC in the next, repeat around (24)
Round 26: SC in the first 3 sts, SC INC in the next, repeat around (30)
Round 27: SC in the first 4 sts, SC INC in the next, repeat around (36)
Round 28: SC in the first 5 sts, SC INC in the next, repeat around (42)
Rounds 29-34: SC around (42)
NOTE: Here is where we will attach the facial features. Place the safety eyes 6 stitches apart between rounds 31 and 32. (For a girl version, I recommend sewing on the eyelashes before securing your safety eyes).
Beak - Sew the beak centered between the eyes with a small amount of stuffing.
Cheeks – With your tapestry needle and yarn for cheeks pass through one stitch on either side of your beak just under the eyes.
(Be sure to stuff the neck and shoulders firmly as you go. This will keep the neck sturdy.)
Round 35: SC in the first 5 sts, INV DEC in the next, repeat around (36)
Round 36: SC in the first 4 sts, INV DEC in the next, repeat around (30)
Round 37: SC in the first 3 sts, INV DEC in the next, repeat around (24)
Round 38: SC in the first 2 sts, INV DEC in the next, repeat around (18)
Round 39: SC in the first st, INV DEC in the next, repeat around (12)
Round 40: INV DEC around (6)
Fasten off and sew remaining part closed, weave in your end.
With pink
Round 1: Create a magic circle with 6 SC
Round 2: SC INC in each st (12)
Rounds 3-4: SC around (12)
Round 5: SC in the first 3 sts, SC INC in the next 6, SC in the last 3 sts (18)
Round 6: SC around (18)
Round 7: SC in the first 6 sts, SC INC in the next 6, SC in the last 6 sts (24)
Round 8: SC around (24)
Fasten off leaving a long tail for sewing.
Starting with pink, make 2
Round 1: Create a magic circle with 6 SC
Round 2: SC INC in each st (12)
Round 3: SC in the first st, SC INC in the next, repeat around (18)
Rounds 4-8: SC around (18)
Do not fasten off, we will now work across the top in rows.
Row 1: Fold flat (as pictured below) and make 9 SC across the top making sure to go through both top stitches. Leaving a long tail of your pink yarn change to white for the last row.
Row 2: *2 DC in the first st, sl st into the next*, *repeat across ending with 2 DC into the last st (this creates the feathers). Fasten off and weave in your white strand.
With beige make 2, lightly stuffing as you go
Round 1: Create a magic circle with 7 SC
Rounds 2-12: SC around (7)
Fasten off leaving a long tail for sewing.
Assembly -
- First, sew the tail centered onto the back of the body stuffing as you go.
- Next, sew the wings centered with the facial features and a slight angle upward as pictured below.
- Lastly, sew the legs onto the bottom of your flamingo starting at the 2nd round and ending at the 6th round.
Love free patterns? Check out our latest One More Row free crochet link party! Free designs are submitted by various designers throughout the month and your clicks help decide the top 5 patterns that will be featured in next months party!
If you're a designer feel free to link up a free pattern, we'd love to share it! Thanks so much for stopping by!


Obrigada por sua receita! Adorei 💖💖😘😘😘
ReplyDeleteLove this it's so cute, I want to make a bigger one soon
ReplyDelete