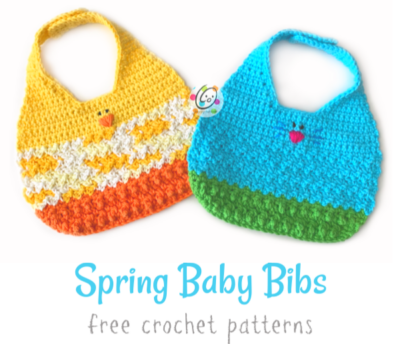
This week I added the crochet patterns for my Spring Hanging Towels and Spring Cloths to my blog. In the past, people have mentioned how cute the cloths would be as baby bibs. Well, this week another awesome peep mentioned that so I had to give it a try. I LOVE how they turned out.
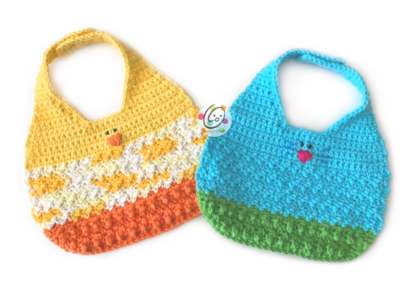
Spring Bibs Crochet Pattern
The crochet pattern is available for free below.
A downloadable, ad-free pattern is also available to purchase from my Ravelry Shop.
Make Ahead Monday Special: This pattern is featured in my year-long quest of making gifts to stash away. CLICK HERE to download this pattern for free this week (ends 3/12/23) only with coupon code: freemamonday
Directions
Chick: Start with orange yarn.
Bunny: Start with green yarn.
1. With an H hook and yarn, ch 24, 2sc in 2nd ch from hook, sc 21, 2sc in last ch. (25sts)
2. Ch 2, turn, 2hdc in same st, *sc in next st, tr in next st*, repeat until 2 sts remain, sc in next st, 2hdc in last st. (27sts)
3. Ch 2, turn, 2hdc in same st, *sc in next st, tr in next st*, repeat until 2 sts remain, sc in next st, 2hdc in last st. (29sts)
4. Ch 2, turn, 2hdc in same st, *tr in next st, sc in next st*, repeat until 2 sts remain, tr in next st, 2hdc in last st. (31sts)
5. Ch 1, turn, 2sc in same st, sc in each st until 1 st remains, 2sc in last st. (33sts)
6. Change yarn color (chick: yellow or variegated yellow; bunny: blue or choice of color). Ch 2, turn, hdc in same st, *sk 1, (sc, dc) in next st*, repeat to end of row.
7-12. Ch 2, turn, hdc in same st, *sk 1, (sc, dc) in next st*, repeat to end of row.
13. Note: if variegated yarn was used for body of chick, change to solid yellow yarn at this point if desired.
Ch 1, turn, sc2tog, sc in each st until 2 sts remain, sc2tog. (31sts)
14. Ch 1, turn, sc in same st and in each st to end of row.
15. Repeat previous row for an additional 4 rows.
16. This step starts the first strap. Ch 1, turn, sc2tog, sc 8, sc2tog. Leave remaining sts unworked. (10sts)
17. Ch 1, turn, sc in same st and in each st to end of row.
18. Ch 1, turn, sc2tog, sc 6, sc2tog. (8sts)
19. Ch 1, turn, sc in same st and in each st to end of row.
20. Ch 1, turn, sc2tog, sc 4, sc2tog. (6sts)
21. Ch 1, turn, sc in same st and in each st to end of row.
22. Ch 1, turn, sc2tog, sc 2, sc2tog. (4sts)
23. Ch 1, turn, sc in same st and in each st to end of row.
24. Repeat previous row for an additional 19 rows.
25. Finish off and weave in ends.
26. This step starts the second strap. Attach yarn to the last st of the last full row (from step 15).
27. Ch 1, sc2tog, sc 8, sc2tog. Leave remaining sts unworked. (10sts)
28. Repeat steps 17-25.
Neck Edging: With the right side of the bib facing you, attaching matching yarn to the inner corner st of the right bib strap. Ch 1, sc in same st and in each st along neck edge, working sc2tog at the bottom 2 corners (where straps meet neck). Finish off and weave in ends.
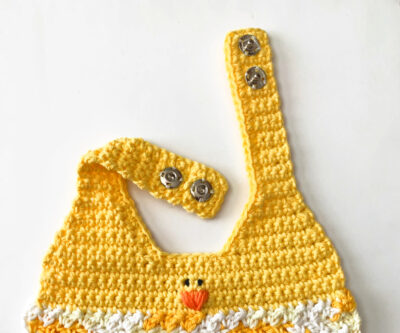
Beak/Nose: With a yarn needle and yarn (orange for chick beak, pink for bunny nose), stitch beak/nose in place.
Eyes: With a yarn needle and black yarn, take a few stitches above the nose to create the eyes.
Whiskers (bunny only): With a yarn needle and yarn (color of choice), create three lines on either side of the nose.
Closure: With a sewing needle and matching thread, stitch two snaps to the ends of the bib straps.
Pin To Save For Later