*UPDATE* The link to the bobble chart has been fixed. [9/16/21]
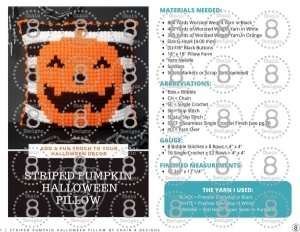
ADD A TOUCH OF FUN TO YOUR HALLOWEEN DECOR WITH THIS SMILING STRIPED PUMPKIN PILLOW COVER!
As summer comes to an end, my mind is starting to think about Halloween. Next to Christmas, Halloween is a favorite holiday in our house. While I won’t start decorating till the first of October (the husband and our HOA can be such a party poopers sometimes LOL), I can definitely start making new things to add to our decor. This smiling little jack-o’-lantern will be the newest addition.
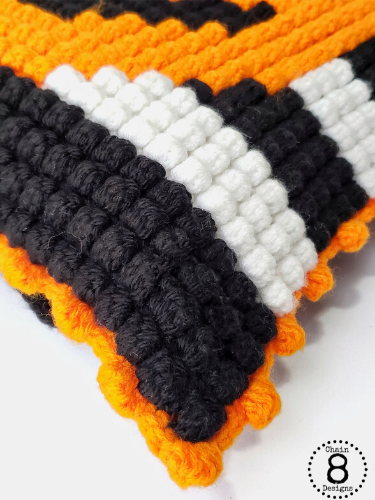
The front cover of this pattern is made with the bobble stitch and it is by far my FAVORITE stitch to make pillows with. The stitch gives a great nubby texture that just can’t be beaten! The stitch is made with only double and single crochets, making it a great stitch for those that are newer to crochet. If you have never made bobbles before, you can read my Bobble Stitch Tutorial to learn how to make the stitch and read bobble graphs.
The back of cover is a solid single crochet cover with buttonholes at the bottom to make the cover super easy to take off for washing and to store for use year after year. If you’re anything like me, you have tons of pillows for every holiday and storage can be an issue. Pillow covers fold up nicely and take up minimal space. Seriously who has room to store 20 decorative pillows? If you do, can I move in because you’ve got WAY MORE room than I do. LOL
The pattern features:
A coordinating border of bobble stitches that look very similar to pom pom edging and adds a fun touch to the pillow.
The cover fits an 18″ x 18″ pillow form. (At this time the pillow only comes in the one size.)
Full materials list
Full list of crochet stitch abbreviations
Two gauge swatches to ensure proper sizing
Bobble chart (full color with numbered rows)
Now on to the pattern…
STRIPED PUMPKIN HALLOWEEN PILLOW
MATERIALS NEEDED:
800 Yards Worsted Weight Yarn in Black
400 Yards of Worsted Weight Yarn in White
300 Yards of Worsted Weight Yarn in Orange
Size G Hook [4.00 mm]
(5) 7/8″ Black Buttons
18″ x 18″ Pillow Form
Yarn Needle
Scissors
Stitch Markers or Scrap Yarn[optional]
THE YARN I USED:
BLACK = Premier Everyday in Black WHITE = Premier Everyday in White ORANGE = Red Heart Super Saver in Pumpkin
DISCLAIMER: This post may contain affiliate links. I receive a small percentage from any purchases you may make (at no cost to you.)
The front cover is made using the bobble stitch.If you have never worked with the bobble stitch before or need a refresher, please read my Bobble Stitch Tutorial.
Please read each section carefully. There are notes and suggestions to help you along the way.
Make sure to complete the gauge swatches before you begin.Not everybody’s tension is the same and not all worsted weight yarn is created equal, both can impact the overall size of your finished project.
If you have any questions about this pattern, please don’t hesitate to e-mail me at chain8designs@gmail.com.Put the pattern name as the subject line and I will get back to you as soon as I can.You can also send me a message on Facebook through the Chain 8 Designs page. I want everyone to enjoy making this pattern, so don’t hesitate to contact me if you have any questions or problems along the way. I’m always here to help!
PATTERN PIECES
FRONT COVER
For the front cover we will be following a bobble chart. If you have never worked with a bobble chart before, please read my Bobble Stitch Tutorial for instructions on how to follow the chart.
*At this time there is not a set of full written directions for the front cover.*
We will be using a four (4) double crochet bobble.
This pattern is worked on the tighter side.
Each square on the chart represents one (1) completed bobble.
The chart is worked from bottom to top and right to left.Start at 1/1 in the bottom right-hand corner.
After you have finished a couple of rows, I would double-check the width of your cover to make sure that your tension has not changed from when you completed your gauge swatch.
For those that are not used to working from a bobble chart, I will walk you through a few rows to help get you started.Make sure that you are crocheting on the tighter side and refer back to your gauge swatch to check that you are keeping your tension consistent throughout.
Being that each square of the chart is one completed bobble stitch, each row will have a part one (single crochet row) and a part two (bobble stitch row) i.e., Row 1/1 and Row 1/2. Once you have Row 1/1 and Row 1/2 done, you will have completed Row 1 of the chart and so on.
CH 73 [with Black]
Row 1/1: SC in 2nd CH from hook; SC next 71; CH 1; turn (72)
The small back piece is what we will be attaching the buttons to.
CH 73 [with Black]
Row 1: SC in 2nd CH from hook; SC next 71; CH 1; turn (72)
Row 2-6: SC all; CH 1; turn (72)
Row 7:SC all; fasten off; weave in ends (72)
ASSEMBLY
NOTES:
To assemble the pillow, we will be running a row of SC around the edge of the pillow and then adding a row of coordinating bobble edging.
For joining our pattern pieces and the bobble edging we will be using our orange yarn.
We will be putting three (3) SC in each corner. As there is no real corner stitch, the corner stitches will be the first and last stitches of the top and bottom edges.
ATTACHING THE SMALL BACK PIECE
Begin by laying the front cover facedown and aligning the small back piece along the bottom edge.You can place a few stitch markers to hold it in place.
Flip the cover over so the front cover is facing you.
Insert your hook in the first stitch of the right-hand corner (going through both the front cover and small back piece) and pull up a loop, YO, and pull through the loop; SC into the same stitch space [1st corner stitch].Place one more SC in the same stitch space [2nd corner stitches].
Continue to SC along the bottom edge until you have 73 SC [2 starting corner stitches + 70 edge stitches + 1 corner stitch on the other end = 73].
Leave the yarn attached and move to the Attaching the Large Back Piece section.
ATTACHING THE LARGE BACK PIECE
Flip the cover back over so the front cover is facedown.
Lay the large back piece over the front cover (making sure the buttonholes are at the bottom.)
Place either stitch markers or scrap pieces of yarn around the edge to keep the piece in place.
Flip the cover back over so the front cover is facing up.
SC into the same space as the last SC from attaching the small back piece, going through the front cover, small back piece, and large back piece.Now place one more SC in the same stitch space.This will complete the three (3) SC for this corner.
Next, SC 64 stitches up the side.[Make sure for the part where the side of the small back piece is, that you are crocheting through only the front cover and large back piece. Not crocheting the small back piece at the sides will aid in attaching the buttons.]
Place 3 SC in the first stitch of the top edge, then continue to SC 70 stitches across the top until you reach the last stitch, where you will place the 3 SC for that corner.
SC 64 stitches down the other side.
Place the last SC in the same space as the first two SC stitches. This will create the third SC for that corner.You should now have 280 SC.
SL st to the first SC and continue on to theAdding the Bobble Edging section.
ADDING THE BOBBLE EDING
NOTES:
We will be using a four (4) DC bobble.
As you are working, the back cover will be facing you so that the bobbles will pop out to the front.
Instead of crocheting a bobble in one stitch and a SC in the next, we will be crocheting a SL st into the same stitch as the bobble. This will act like the SC and help pop the bobbles towards the front.
From where you left off at the SL st…
CH 1 and turn.The back cover should be facing you.
Bobble in the first stitch and then SL st into the same stitch.
SL st the next four (4) stitches.
Repeat Steps 2 and 3 until you have 4 stitches left.
Bobble then SL st in the next stitch.
SL st in the next three (3) stitches.
SSCF to the first bobble; weave in ends.
ATTACHING THE BUTTONS
Lay the cover facedown and smooth it out.
Pull the large back piece down so that the bottom edge aligns with the bottom edge of the front cover/small back piece.
Insert the non-hook end of your hook or your yarn needle into the center of the middle buttonhole.
Without removing the hook, lift the large back piece.This will show you where you will place the first button.
Attach the button.
Repeat Steps 3-5 until you have attached all five buttons.
Once your cover is complete, the last step is to insert your pillow form and close the buttons.Now you can stand back and admire the beautiful work you did.
GO YOU!
If you make this pattern, I would love to see your finished pillows. Post on Instagram and tag @chain8designs so I can ooh and ahh at your great work! I love nothing more than seeing people use my patterns, especially when you use different colors than I did. I’ve seen color combos that I never thought of and like more than the original. LOL
Till next time friends…HAPPY HOOKING!
**Feel free to make and sell items that are made from this pattern. Please link back to the pattern on any online sales or include my web address on tags for any in-person sales. Please do not republish or distribute any of the pictures or patterns, in any form, from this site without permission from me. Please e-mail me for any inquiries.**
Would you like a downloadable or printable copy of the pattern with pictures to help you along the way? No ads or comments
PURCHASE A COPY ON RAVELRY TODAY!
The pattern includes:
Full materials list
Full list of crochet stitch abbreviations
Two gauge swatches to ensure proper sizing
Bobble chart (full color with numbered rows)
Measurements of each completed pattern piece
Photos of each completed pattern piece and pictures to show any tricky bits
Also included with your purchase in a copy of my Bobble Stitch Tutorial to teach you how to make the stitch and follow a bobble chart
I agree with Ms. Tammy who posted on 06/28/2022 that the pumpkin pillow chart will not download… Today is 08/15/2022
Tammy
Hello. I just read your pattern on this striped pumpkin pillow cover. I have all your instructions downloaded however, I can’t get the chart pulled up to download it. I’m really excited to try this! I’ve never worked with a chart before, so this will be new for me.
Hi Natalie. Give the chart another try. I was able to open it on both my computer and phone. If you’re still not able to open it, could you please let me know? 🙂


I agree with Ms. Tammy who posted on 06/28/2022 that the pumpkin pillow chart will not download… Today is 08/15/2022
Hello. I just read your pattern on this striped pumpkin pillow cover. I have all your instructions downloaded however, I can’t get the chart pulled up to download it. I’m really excited to try this! I’ve never worked with a chart before, so this will be new for me.
Hi Tammy. I just checked and was able to open the chart. Give it a try again and let me know if you’re still not able to open it.
I can’t seem to open or download the chart either
Hi Natalie. Give the chart another try. I was able to open it on both my computer and phone. If you’re still not able to open it, could you please let me know? 🙂