Crochet Ice Cream Pattern – Fun, Easy and Quick
There is one thing that always rings true in my life: My love of ice cream. This crochet ice cream cone pattern comes to you from my new stash busting mindset: Use what scrap yarn I have stocked for smaller items to keep myself busy and reduce the amount of ordering I have to do.
I’ll be honest. I stood in front of my shelf of yarn and realized I have so many tiny balls of scrap yarn that are left over from previous projects.
Enter: The Crochet Ice Cream Cone Pattern
While racking my brain for an idea, the ice cream craving hit. I pillaged the freezer to walk away in shock that we had no ice cream left. I know! I’ll make my own ice cream! Crochet ice cream, that is.
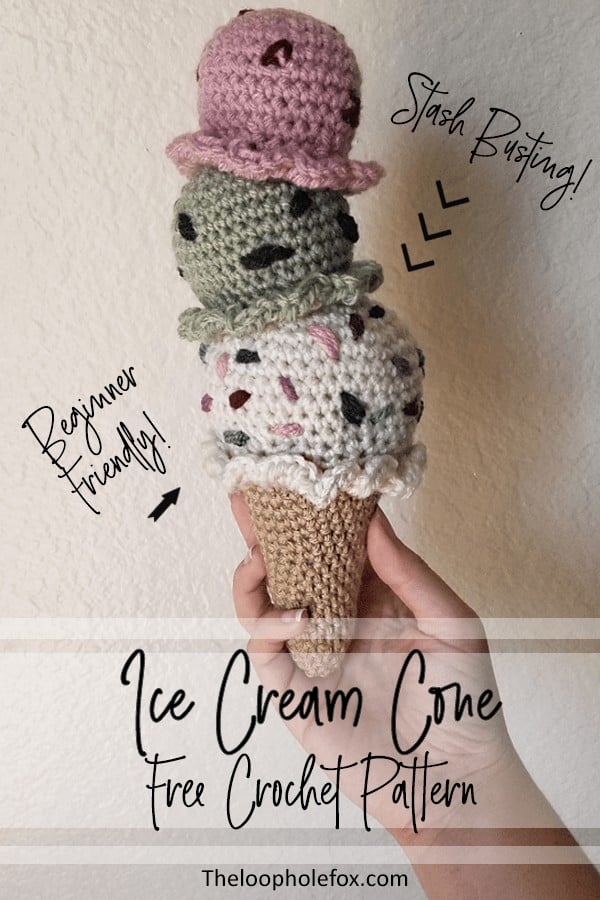
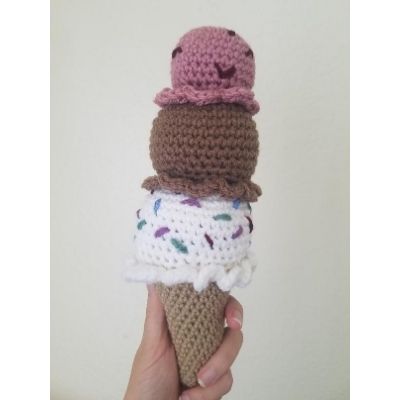
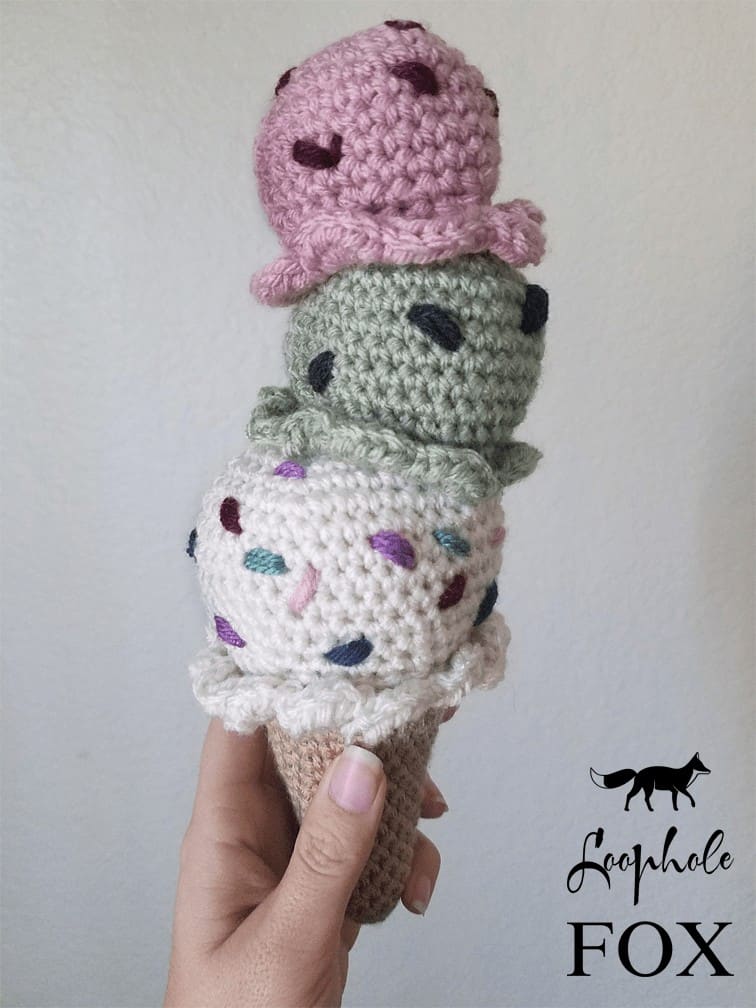
My crochet cone ended up piled with “birthday cake”, “mint chocolate chip” and “strawberry” ice creams however, you can make whichever flavors you like.
This crochet ice cream pattern is so customizable. Make your favorite ice creams based on whatever scrap yarn you have available.
Fun fact about this crochet ice cream: It’s exactly zero calories and has more than your recommended daily intake of fiber!
If you prefer a premium, ad-free PDF version of this pattern, you can grab one on either my Ravelry shop by clicking the button below.
(Disclaimer: Do not eat the crochet ice cream. Please.)
If you’re looking for a quick, beginner friendly and stash busting crochet project, look no further. This crochet ice cream pattern will walk you through how to crochet an ice cream cone and is perfect for those days when you need to binge watch TV and keep your hands busy.
SKILL LEVEL
Easy
MATERIALS & TOOLS
I used scraps of the following yarn. All scraps used were less than 1/2 a skein, some much less than that. Some of the yarn I used were literal scraps and ends I cut off of other projects and hadn’t tossed yet.
All yarn used was medium (4) weight. You can use any weight you prefer, but it will change the size of your finished product.
Cone: I Love This Yarn in Light Taupe
White Ice Cream: Red Heart Supersaver in Aran
Green Ice Cream: Red Heart Supersaver in Frosty Green
Pink Ice Cream: Red Heart with Love in Cameo
I also used scraps cut off of other projects in red, purple, green, pink and blue for the sprinkles on the “birthday cake” ice cream, scraps of a very dark grey for the chocolate chips on the “mint chocolate chip” and red for the strawberry chunks in the “strawberry” ice cream.
You will also need stuffing. Any standard stuffing you prefer is fine.
TOOLS
5 MM Crochet Hook
Stitch Markers
Scissors
Tapestry Needle
GAUGE
Gauge is not necessary.
FINISHED SIZE
Cone fits with in adult hand easily.
ABBREVIATIONS
- ch – chain
- sc – single crochet
- hdc – half double crochet
- sl st – slip stitch
- inc – increase (place two single crochet in one stitch)
- dec – decrease (insert hook into st, yarn over and pull through. Insert hook into next st, yarn over, pull through. Yarn over, pull through all three)
- st – stitch
- * * – repeat inside
- mc – magic circle
- FO – finish off
NOTES
- Each scoop is a different size for maximum stacking.
- All rounds are worked in continuous rounds meaning you will continue working the round, not close with a slip stitch and chain to start another row.
- I highly recommend to use up your stash and create your own flavors. We’re basically going to be a novelty ice cream shop around here.
- This pattern calls to use a magic circle several times. If you are unfamiliar with how to create the magic circle and would like to learn, check out my magic circle tutorial video.
How to Make this Crochet Ice Cream Cone
Cone
R1 – In mc, place 6 sc. (6)
R2 – *1 sc 2 sts, inc* Rpt 2x (8)
R3 – *1 sc 3 sts, inc* Rpt 2x (10)
R4 – *1 sc 4 sts, inc* Rpt 2x (12)
R5 – *1 sc 5 sts, inc* Rpt 2x (14)
R6 & 7 – 1 sc each st around (14)
R8 – *1 sc 6 sts, inc* Rpt 2x (16)
R9 & 10 – 1 sc each st around (16)
R11 – *1 sc 7 sts, inc* Rpt 2x (18)
R12 & 13 – 1 sc each st around (18)
R14 – *1 sc 8 sts, inc* Rpt 2x (20)
R15 – *1 sc 9 sts, inc* Rpt 2x (22)
R16 – *1 sc 10 sts, inc* Rpt 2x (24)
R17 – *1 sc 11 sts, inc* Rpt 2x (26)
R18 – *1 sc 12 sts, inc* Rpt 2x (28)
R19 – *1 sc 13 sts, inc* Rpt 2x (30)
FO, weave ends.
First Scoop (Biggest)
R1 – In mc, place 6 sc (6)
R2 – inc each st (2 sc each st) (12)
R3 – *1 sc, inc* Rpt 6x (18)
R4 – *1 sc 2 sts, inc* Rpt 6x (24)
R5 – *1 sc 3 sts, inc* Rpt 6x (30)
R6 – *1 sc 4 sts, inc* Rpt 6x (36)
R7 – *1 sc 5 sts, inc* Rpt 6x (42)
R8 through 12 – 1 sc each st around (42)
R13 – *1 sc 5 sts, dec* Rpt 6x (36)
R14 – *1 sc 4 sts, dec* Rpt 6x (30)
R15 – 1 sc each st around (30)
Sl st to close. Do not FO, place stitch marker to not lose place and set aside for now.
Second Scoop (Medium)
R1 – In mc, place 6 sc (6)
R2 – inc each st (2 sc each st) (12)
R3 – *1 sc, inc* Rpt 6x (18)
R4 – *1 sc 2 sts, inc* Rpt 6x (24)
R5 – *1 sc 3 sts, inc* Rpt 6x (30)
R6 – *1 sc 4 sts, inc* Rpt 6x (36)
R7 through 11 – 1 sc each st around (36)
R12 – *1 sc 4 sts, dec* Rpt 6x (30)
R13 – *1 sc 3 sts, dec* Rpt 6x (24)
R14 – 1 sc each st around (30)
R15 – *6 hdc in first st, sl st into next* Rpt around to end. Sl st to close, FO and leave a long tail.
Third Scoop (Smallest)
R1 – In mc, place 6 sc (6)
R2 – inc each st (2 sc each st) (12)
R3 – *1 sc, inc* Rpt 6x (18)
R4 – *1 sc 2 sts, inc* Rpt 6x (24)
R5 – *1 sc 3 sts, inc* Rpt 6x (30)
R6 through 9 – 1 sc each st around (30)
R10 – *1 sc 3 sts, dec* Rpt 6x (24)
R13 – *1 sc 2 sts, dec* Rpt 6x (18)
R14 – 1 sc each st around (18)
R15 – *6 hdc in first st, sl st into next* Rpt around to end. Sl st to close, FO and leave a long tail.
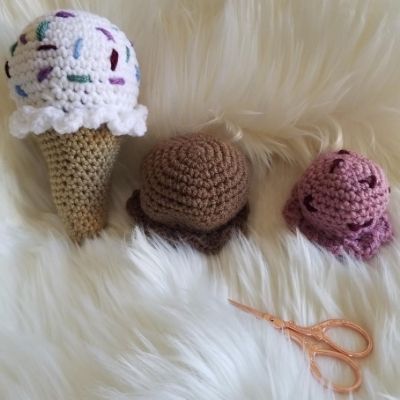
ACCENTS & ASSEMBLY
Before assembling, embroider on whatever accents you like.
For example, I embroidered sprinkles on the white scoop randomly around in different colors, the chocolate chips in one color and the strawberry chunks in one color.
Next, you’ll want to assemble your pieces together.
You will want to attach your biggest scoop (the one you did not FO) to your cone first.
Stuff your cone firmly. Place your hook back into the working yarn on your scoop, and chain 1. Working through both the scoop and cone stitches, place 1 sc in each st around. Place approximately 25 sts before stopping to finish stuffing. Stuff your scoop and fill as necessary. Finish your sc’s. Second row: *6 hdc in first st, sl st next* repeat around. FO, weave ends.
To attach your second scoop, decide on placement and pin to the first. I placed mine a bit off center, but you can place yours however you like.
Once happy with the placement, use a needle and yarn to sew the unstuffed scoop on. When you’re about 3/4ths of the way through sewing it on, stop to stuff. Stuff firmly and finish sewing on.
You will attach your third scoop to your second scoop in the same way you attached your second to your first.
And with that final crochet ice cream scoop on, you’re done!
Or maybe not, you could always attach more scoops! The best thing about this ice cream is you can add as many scoops as you like and they’ll never fall off the cone – as long as you have scrap yarn to keep making them!
One of my greatest joys is seeing your finished crochet projects from my patterns or tutorials, so when you post to Instagram, don’t forget to tag me so I can show you some love! I’m @theloopholefoxcrochet. You can also share pictures on my recent posts on Facebook or within my Facebook group!
And don’t forget to pin this to your Pinterest boards, so you can remember it for later!
Don’t forget to join my Facebook Group so we can chat all about your creations! We are a group for crocheters of all experiences, all interests and love to hang out together. Come join the fun!

Shannon | Designer & Editor
Shannon helps crocheters find their next project and build their skills with in depth tutorials and crochet patterns on her blog, theloopholefox.com.
With more than a decade of crochet experience, Shannon knows that understanding why we do something matters just as much as how we do it. She teaches new techniques and crochet stitches in depth so you can crochet with confidence.