About the Free Shark Crochet Pattern
I think sharks are amazing animals. They have existed long before dinosaurs roamed the earth and each of the hundreds of species of sharks can look so different as they evolved to adapt to many ecological niches. I took an intro to palaeontology class in university and can still vividly remember learning about some particularly gnarly looking prehistoric sharks (see the whorl shark).
There have been a few famous sharks in media like the one from Jaws, and Bruce from Finding Nemo. They are based on the Great White shark, the largest predatory fish in the world. These imposing beasts can rocket through the water at high speeds and intimidate with rows of large serrated teeth.
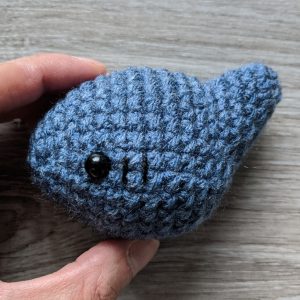
My amigurumi interpretation of the Great White isn’t quite as fearsome as the real thing. I definitely wanted to keep the torpedo shape but I added strategic increases and decreases near the tail to make it flick up a bit. This is a simple pattern that will show you how to subtly shape a piece by placing increases and decreases right next to each other. You can use whatever colour of yarn you wish for the main body. Search up different species of sharks. They come in so many different colours so you might be able to find a use for that variegated yarn that you bought because it was interesting but you have no idea what to do with it!
MATERIALS
Yarns – main colour (A) [I used Sky Blue Bernat Premium], white (W)
Black yarn or embroidery thread
polyester fibrefill
two 8.0 mm safety eyes
size 8 (5.0 mm) crochet hook [I use hooks from Laurel Hill]
yarn needle [I use the bent tip needles from Clover]
ABBREVIATIONS
ch = chain
st = stitch
sc = single crochet
sl st = slip stitch
inc = single crochet 2 into the same stitch
dec = decrease over next two stitches (single crochet 2 stitches together or use invisible decrease)
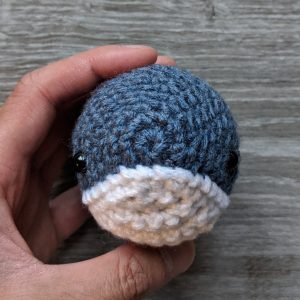
HEAD/BODY
R1 With A, sc 6 in magic ring (6)
R2 inc in each st around (12)
R3 sc in each st around (12)
R4 (sc 2, inc) four times (16)
R5 (sc 3, inc) four times (20)
R6 (sc 4, inc) four times (24)
R7 (sc 3, inc) six times (30)
R8-14 sc in each st around (30)
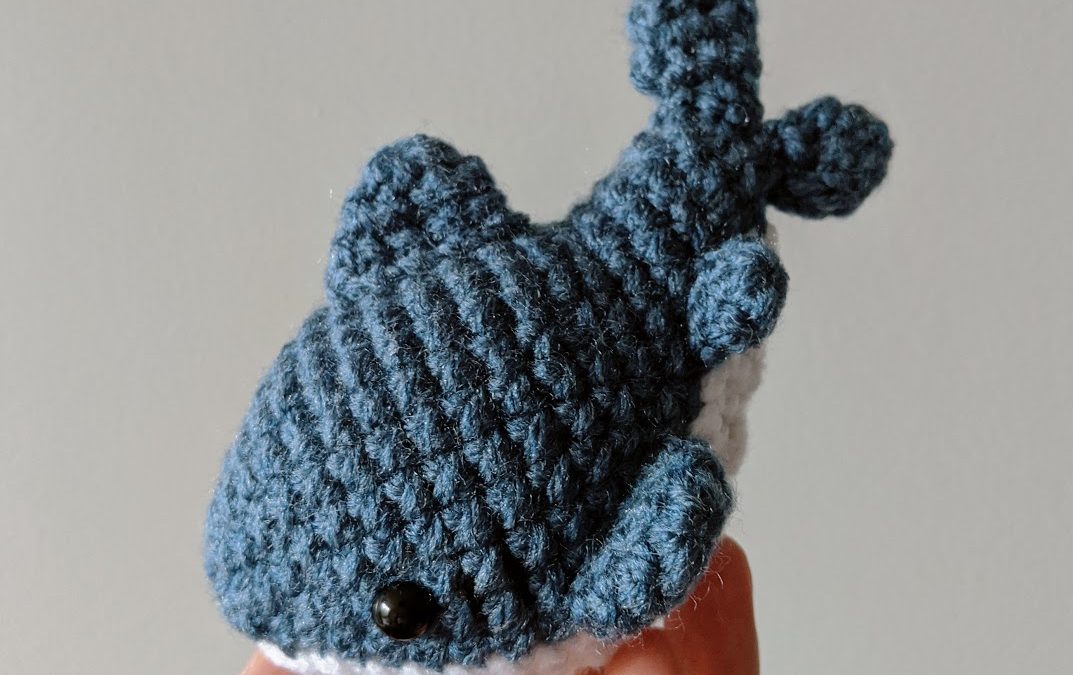
Before we begin the closing rounds, we will place the safety eyes and gills.
Insert the safety eyes below R7 and 15 stitches apart.
Cut a small strand of black yarn or thread and embroider 2 gill slits behind the eyes.
R15 (sc 3, dec) six times (24)
R16 (sc 4, dec) four times (20)
R17 dec, dec, sc 4, inc, inc, inc, inc, sc 4, dec, dec (20)
R18 dec, sc 16, dec (18)
R19 dec, dec, sc 4, inc, inc, sc 4, dec, dec (16)
R20 (dec, sc 2) two times, (sc 2, dec) two times (12)
R21 (dec, sc 1) two times, (sc 1, dec) two times (8)
R22 dec four times (2)
Finish with a sl st. Cut a short tail for sewing. Stuff with polyfill and then sew the opening closed.
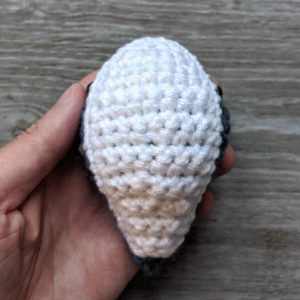
BELLY STRIPE
This piece is worked in rows.
With W, chain 4.
R1 Skip first ch, sc 3, ch 1 and turn
R2 Skip first ch, sc 1, inc, sc 1, ch 1 and turn
R3 Skip first ch, inc, sc 2, inc, ch 1 and turn
R4 Skip first ch, sc 6, ch 1 and turn
R5 Skip first ch, inc, sc 4, inc, ch 1 and turn
R6-9 Skip first ch, sc 8, ch 1 and turn
R10 Skip first ch, sc 3, dec, sc 3, ch 1 and turn
R11-12 Skip first ch, sc 7, ch 1 and turn
R13 Skip first ch, sc 3, dec, sc 2 ch 1 and turn
R14 Skip first ch, sc 6, ch 1 and turn
R15 Skip first ch, sc 2, dec, sc 2, ch 1 and turn
R16 Skip first ch, sc 5, ch 1 and turn
R17 Skip first ch, sc 2, dec, sc 1, ch 1 and turn
R18 Skip first ch, sc 4, ch 1 and turn
R19 Skip first ch, sc 1, dec, sc 1, ch 1 and turn
R20 Skip first ch, sc 1, dec
You will now crochet around the edge of the piece.
From point A to B, sc 19.
From point B to C, sc 3.
From point C to D, sc 19.
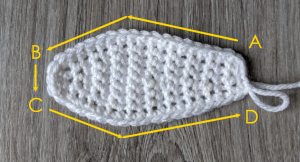
Fasten off. Cut a long tail for sewing.
Place the side with the yarn tail near the bottom of the tail and then sew around the edges to the body.
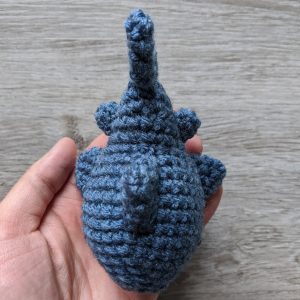
DORSAL FIN
R1 With G, sc 6 in magic ring (6)
R2 sc 2, inc, inc, sc 2 (8)
R3 sc 3, inc, inc, sc 3 (10)
Finish with a sl st. Cut a long tail for sewing.
Sew to the top of the body.
PECTORAL FIN (Make 2)
R1 With G, sc 6 in magic ring (6)
R2 sc 2, inc, inc, sc 2 (8)
R3 sc 3, inc, inc, sc 3 (10)
Finish with a sl st. Cut a long tail for sewing.
Sew to the sides of the body.
PELVIC FIN (Make 2)
R1 With G, sc 5 in magic ring (5)
R2 sc 4, inc (6)
Finish with a sl st. Cut a long tail for sewing.
Sew to the sides of the body near the tail.
CAUDAL FIN
TOP PART
R1 With G, sc 6 in magic ring (6)
R2 sc 2, inc, inc, sc 2 (8)
R3 inc, sc 1, dec, dec, sc 1, inc (8)
R4 (sc 2, dec) two times (6)
Finish with a sl st. Cut a long tail for sewing.
Sew to the top of the tail.
BOTTOM PART
R1 With G, sc 6 in magic ring (6)
R2 (sc 2, inc) two times (8)
R3 (sc 2, dec) two times (6)
Finish with a sl st. Cut a long tail for sewing.
Sew to the bottom of the tail.


HEAD/BODY
R21 (dec, sc 1) two times, (sc 1, dec) two times (8)
R22 dec six times (6)
*for R22 is it should dec 4 times (4)?
BELLY STRIPE
R5 Skip first ch, inc, sc 4, inc, ch 1 and turn
R6-9 Skip first ch, sc 6, ch 1 and turn
*for 6-9 is it should be sc 8?
You are right! Thank you!
What does it mean when your shark pattern asks for decrease decrease decrease?
Hi, I can’t figure out why it’s doing this but I have followed everything and the tail keeps ending up so crooked off to side rather than in the middle???
Hello would it be alright if I sold my finished product of this and credit you?
Please do!
Starting with the dorsal fin dose the with G mean hook G?
“G” indicates the colour grey.
What is the length from nose to tail and width at widest point?
The fins I make tend to be little “cups”. Do you turn your work at the end of each round or continue to work in the round?
Hello, they’re worked in the round and supposed to be cup-shaped. You press both sides flat when you sew the fins to the body.
This is such a cute pattern and it was a joy to complete <3
Hi there! How are the dorsal and pectoral fins connected? The pieces are round but the fins are all angular/triangle shaped. Are they folded?
Hi Angie, the fins are sewn flat and not folded. The piece being less angled might just be a difference in your tension while crocheting. It’s not too big an issue if it’s a bit more rounded.
May I use this pattern for my small buisness
I thought your pattern was perfectly written! Thank you so much for offering for free. You are so talented!
Hi, do you mind if I sell this? I would give you credit of course.
Yes, you’re free to sell your finished product.
loved this! It turned out wonderfully😍
I thought your pattern was perfectly written! Thank you so much for offering for free. You are so talented!
Can I sell this, please? I will make sure to include credits for you.
Hey,
thanks alot for your pattern, it was very clear and straight forward to follow! Your design is really cute.
I made two plushies from approx. 20cm size with a chunky yarn and a 6mm crochet needle out of it and they turned out well. 🙂 I didn’t even needed to modify anything. Thanks again!