HEAD AND BODY
-
Using color A (green)
-
Make a slipknot and chain 7
-
R1: sc in the 2nd chain from hook, sc in next 5 ch sts,
-
Working down the other side of the chain
-
sc in next 6 ch sts {12 sts}
-
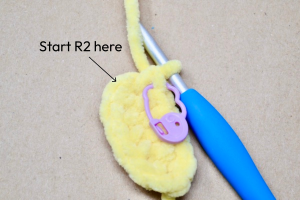
We’re working in continuous rounds.
-
R2: (inc, sc) 6 times {18 sts}
-
R3: (inc, sc in next 2 sts) 6 times {24 sts}
-
-
R4: sc in next 24 sts {24 sts}
-
R5: (inc, sc in next 3 sts) 6 times {30 sts}
-
R6: (dec, sc in next 3 sts) 6 times {24 sts}
-
R7: sc in next 24 sts {24 sts}
-
R8: (dec, sc in next 2 sts) 6 times {18 sts}
-
R9: sc in next 18 sts {18 sts}
-
R10 we’re making the ears. Using stitch markers, mark the back loops only of the 3rd and 8th stitch. All ear stitches will be worked into the front loop of the marked stitch. I suggest marking the first sc and last sc of each ear as it’s helpful for R11.
-
R10: sc in next 2 sts, [ear: in next flo, sc, hdc, ch 1, dc, hdc, sc all in the same stitch], sc in next 4 sts, [ear: in next flo, sc, hdc, ch 1, dc, hdc, sc all in the same stitch], sc in next 10 sts {18 sts} counting the marked back loops, not the flo stitches of the ears.
-
-
For R11: As we work this round, we will work into the back loops that we marked for R10 and not into the marked stitches of the ear. After you work into the marked back loop, reach your hook over into the next stitch - the one next to your marked ear stitch.
-
R11: sc in next 2 sts, sc into marked back loop st, sc in next 4 sts, sc into marked back loop st, sc in next 10 sts {18 sts}
-
For round R12 we will work into the back loop only for four stitches. Feel free to mark the front loop only of the first and fourth stitch. This is helpful later when making the flap. See video for help.
-
R12: inc, sc, inc, sc blo in next 4 sts, inc, sc, inc, (sc in next 3 sts, inc) 2 times {24 sts} Change to color B (cream)
-
R13-14: sc in next 24 sts {24 sts}
-
R15: (inc, sc in next 3 sts) 6 times {30 sts}
-
R16: sc in next 30 sts {30 sts}
-
R17: (dec, sc in next 3 sts) 6 times {24 sts}
-
-
We’re going to pause here and crochet into the front loops from R12 to make the flap. Place a stitch marker in your last stitch to secure the yarn.
-
For the flap, we’ll be working in rows by chaining 1 and turning our work.
-
R1: Place a slipknot in color A (green) yarn onto the hook. With the top of the head facing you, place the hook under the first flo stitch of R12
-
Make a single crochet, then sc in the next 3 flo sts {4 sts}
-
R2: ch 1, turn; (dec) 2 times {2 sts}
-
R3: ch 1, turn; dec {1 st}
-
Fasten off and leave a tail. Weave in all ends.
-
Insert the 18mm safety nose into the tip of the flap.
-
-
Place the nose between round R15 and R16 of the head.
-
Then, insert the 14mm safety eyes between R14 and R15, positioning one eye on each side of the flap. Secure nose and eyes.
-
For Round 18, we'll be crocheting bobbles and switching colors. Please watch video on how to center your bobbles before you crochet. All bobbles will be worked into the front loops only. If you prefer, feel free to use a single color throughout R18 for simplicity.
-
For R18, we will also be attaching the tail. If you’re not planning to attach a tail, you can skip the tail instructions in Round 18. Instead, simply single crochet after your final bobble stitch.
CCA=change to color A CCB=change to color B
-
R18: sc in next 2 sts, CCA: flo bobble, CCB: sc in next 3 sts, CCA: flo small bobble, CCB: sc, CCA: flo small bobble, CCB: sc in next 3 sts, CCA: flo bobble, CCB: sc in next 5 sts
-
Grab the tail you set aside and place it against your work with the color change facing you. Place the hook under two sts of the tail and one st of the head and make a sc. Repeat two more times working over 3 sts total, sc in last 3 sts {24 sts}
-
Pop out your bobbles.
-
R19: (dec, sc in next 2 sts) 6 times {18 sts}
-
-
Optional: We're going to pause here to attach the tail to the side of the body. Weave the remaining yarn tail, from the tail, into a yarn needle. Lay the tail over to one side and weave the needle through a stitch or two of the body and a stitch or two of the tail. Pull tight on the yarn and make a knot on the inside of the body to secure the yarn. See video for help.
-
R20: (dec, sc) 6 times {12 sts}
-
R21: (dec) 6 times {6 sts}
-
Fasten off and leave a long piece of yarn to sew the body shut.
-
Weave the tail into the top of the fox and slowly pull the yarn through.
-
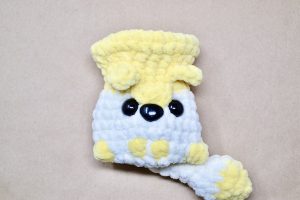
Roll/tuck the cup in as you go until you reach the ears.
-
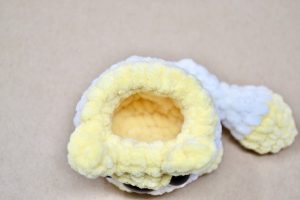
This makes a sturdy cup for desk supplies!
-
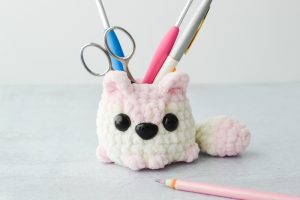
Fill it with supplies!
-
-

Fill it with candy!
-

Fill it with a faux plant!
-
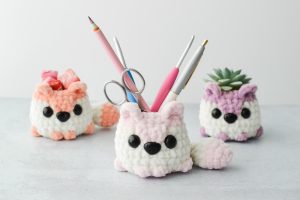
I hope you enjoy your desk buddy!!
-

If you like Fox Desk Buddy, make sure to check out my Bunny Desk Buddy Free Crochet Pattern.