
No-Sew Sad Kitty
Free Amigurumi Crochet Pattern
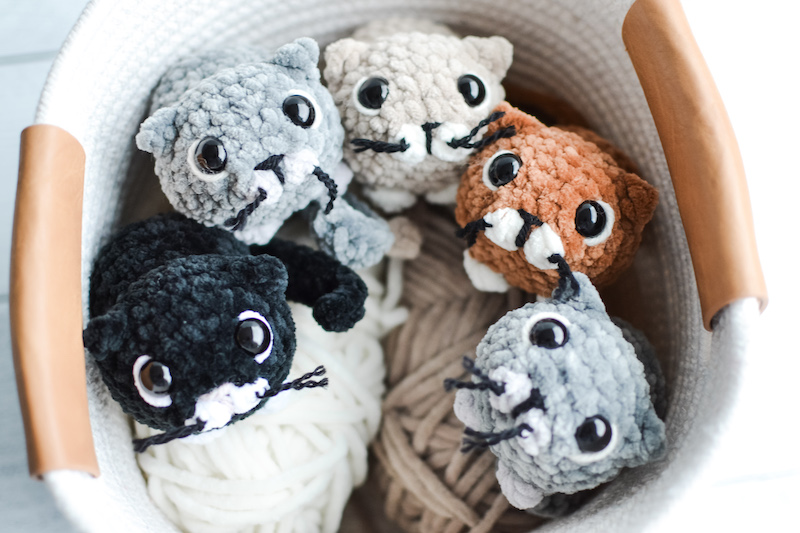
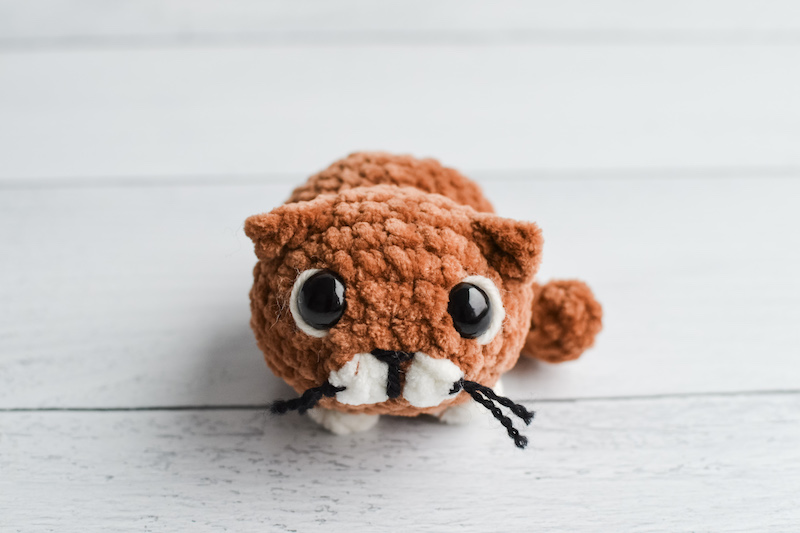
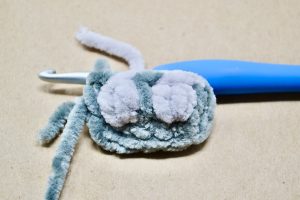
Sad Kitty, with her big, soulful eyes, longs for companionship. However, her timid nature keeps her from mingling with the playful cats in the neighborhood.
Skill Level: Advanced Beginner
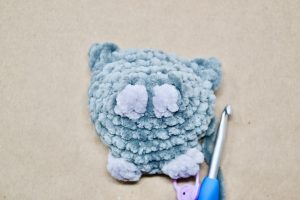
This no-sew pattern is written in U.S. crochet terms, complete with clear instructions, pictures, and video tutorial to help you along the way. Sad Kitty is crocheted in the round/continuous spirals without joining the rounds. I suggest using a stitch marker or different color yarn to keep track of each round. Sad Kitty is crocheted in super bulky chenille yarn and is approximately 2 inches tall and 4 inches long. Be aware that size may vary depending on the yarn and hook size used. Gauge is not particularly important, just be consistent with the tension you are using. And most importantly, have fun!
Jump To The Free Pattern BelowFree Pattern
Video Tutorial
Birthday
October 10, 2024
Likes
Watching Birds and Hiding In Corners
Dislikes
Loud Noises and Wide Open Spaces
Need Help?
Want The Ad-Free Printable Pattern Instead
Buy It Here (Scroll down for the free pattern)
This pattern is free but it is still copyrighted
This crochet pattern, as well as all images and text contained herein are copyrighted by YarnSociety.com and should not be copied, emailed, sold, reproduced, or distributed in any way to any other person or entity, or posted on any website (links to this page are welcome). You may, however, sell the final product or products created from this crochet pattern in accordance with your state and local laws, with the exception of mass production.
No-Sew Sad Kitty Pattern Essentials
Supplies
- Super Bulky (6) Weight Yarn
- Premier Parfait Chunky in Seal (dark grey) (~24 yards/18 grams)
- Premier Parfait Chunky in Pale Grey (light grey) (~3 yards/2 grams)
- Small amount of black and white worsted weight yarn
- H (5.00mm) crochet hook
- Two 14mm plastic safety eyes (Not recommended for children under 3 years old)
- Polyfil or stuffing of your choice
- Yarn/Darning needle
- Embroidery needle
- Scissors
- Locking Stitch Markers (optional)
*These are affiliate links to supplies I personally use and love. Thank you for supporting Yarn Society.
Techniques
Abbreviations
- sc – single crochet
- st/sts – stitch(es)
- inc – increase (add 2 single crochet stitches into a stitch)
- dec – decrease (join 2 single crochet stitches into 1)
- ch – chain
- sl st – slip stitch
- R1- round 1
- ( ) – repeat this group of stitches
- flo – front loop only
- CC – color change
No-Sew Sad Kitty Pattern Example
If a line is written with a single “inc”, “dec” or “sc” – make one single crochet increase, decrease, or single crochet
(inc, sc) 6 times {18 sts}
(2 single crochets in one stitch, then single crochet in the next stitch) – repeat that sequence a total of 6 times for a total of 18 stitches
(dec, sc in next 2 sts) 6 times {18 sts}
(join 2 single crochets into 1, and then single crochet in next 2 stitches) – repeat that sequence a total of 6 times for a total of 18 stitches
X-Small Bobble: (2 dc bobble) Yarn over, insert the hook into the stitch, yarn over, pull up a loop, yarn over, draw through 2 loops on hook. Yarn over, insert hook in same stitch, yarn over, pull up a loop, yarn over, draw through 2 loops on hook . There will be 2 loops on the hook at this time. Yarn over, draw through all 3 remaining loops on the hook. (Don’ t forget to pop your bobble out)
Bobble: (5 dc bobble) Yarn over, insert the hook into the stitch, yarn over, pull up a loop, yarn over, draw through 2 loops on hook. Yarn over, insert hook in same stitch, yarn over, pull up a loop, yarn over, draw through 2 loops on hook – repeat 3 more times. There will be 6 loops on the hook at this time. Yarn over, draw through all 6 remaining loops on the hook. (Don’ t forget to pop your bobble out)
Right Hand Sad Kitty Crochet Along Video Tutorial
Left Hand Sad Kitty Crochet Along Video Tutorial
Full Free Pattern Below↓
No-Sew Sad Kitty Full Pattern
HEAD/BODY
-
Before you begin, cut about a 10 inch piece of your main color and set it aside.
R1 has a color change and an x-small bobble, so it can feel a bit tricky. You’ll want to change the yarn color on your hook right before you make the color change stitch. Right and left hand video tutorials available for this pattern in the pattern example above. Watch the step-by-step video
-
Using color dark grey
-
Make a slipknot and chain 6
-
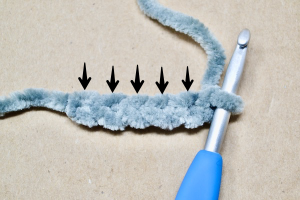
R1: sc in the 2nd chain from hook, sc in next 4 ch sts,
-
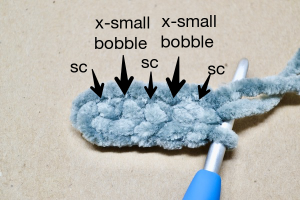
Working down the other side of the chain
-
sc, CC light grey: x-small bobble, CC dark grey: sc, CC light grey: x-small bobble, CC dark grey: sc {10 sts}
-
R2: (inc, sc) 5 times {15 sts}
-
R3: (inc, sc in next 2 sts) 5 times {20 sts}
-
-
R4: (inc, sc in next 3 sts) 5 times {25 sts}
-
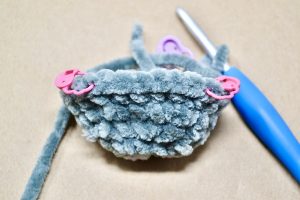
R5 we’re making the ears. Using stitch markers, mark the back loops only of stitch 5 and 12 before you begin crocheting. The ears will be worked into the front loops only of the marked stitches.
-
I also suggest marking the first sc and the last sc stitch of the ear with a stitch marker. Helpful for R6.
-
R5: sc in next 4 sts, [ear: in FLO sc, ch 2, sc in same stitch] sc in next 6 sts, [ear: in FLO sc, ch 2, sc in same stitch] sc in next 13 sts {25 sts}
-
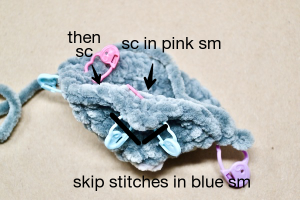
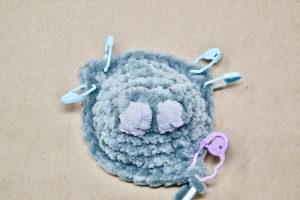
As we work this round, we will work into the back loops that we marked for R5 and not into the stitches of the ear. After you work into the back loop, reach your hook over into the next stitch - the one next to your marked ear stitch. We’ll also be crocheting bobbles and making color changes. The bobbles will be worked into the front loop only.
-
R6: sc in next 19 sts, CC light grey: flo bobble, CC dark grey: sc in next 2 sts, CC light grey: flo bobble, CC dark grey: sc in next 2 sts {25 sts}
-
R7: sc in next 25 sts {25 sts}
I like to use an embroidery needle to embroider on the nose and eyes. Watch the step-by-step video tutorial for the nose.
-
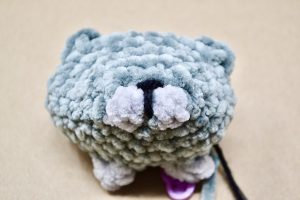
Grab a piece of black yarn and embroider a nose by making a line across and a line down - between R1 color change.
-
-

Place 14mm safety eyes between R2 and R3, leaving 4 stitches open between the eyes.
-
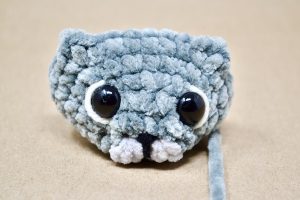
Grab a long piece of cream yarn and embroider a line next to the eye as pictures. Secure safety eyes.
-

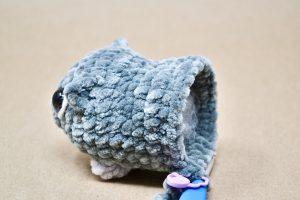
Optional: Using the yarn that you cut at the start, secure down the ears. They do tend to stick up at times if you don’t secure them.
-
R8: sc in next 4 sts, 5 dec, sc in next 11 sts {20 sts}
-
R9: sc in next 4 sts, inc in next 5 sts, sc in next 11 sts {25 sts}
-
You can begin to stuff the face and continue as you crochet.
-
R10-12: sc in next 25 sts {25 sts}
-
R13: (dec, sc in next 3 sts) 5 times {20 sts}
-
-
R14: (dec, sc in next 2 sts) 5 times {15 sts}
-
R15: (dec, sc) 5 times {10 sts}
-
R16: (dec) 5 times {5 sts}
-

Fasten off and leave a long piece of yarn to sew the body shut.
-
If you like No-Sew Sad Kitty, make sure to check out my Pocket Frog Free Crochet Pattern.